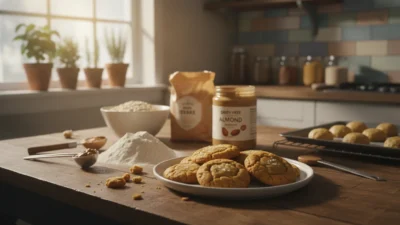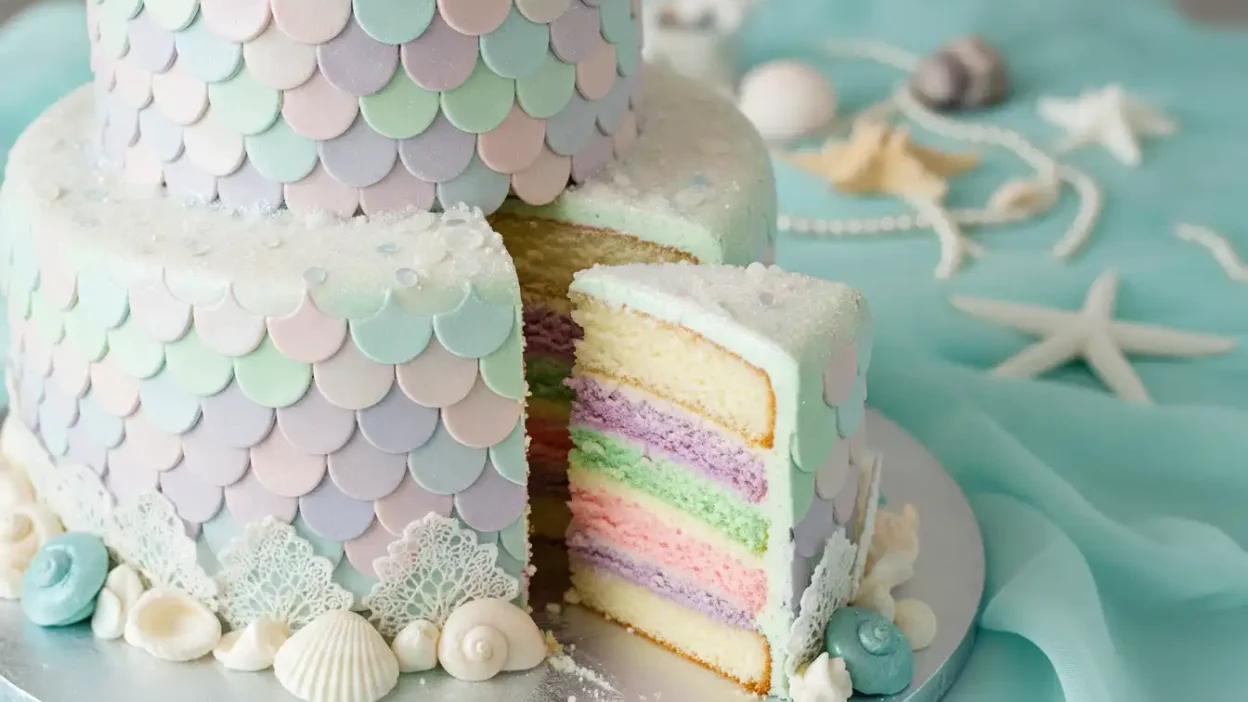
Surprise a birthday guest with a show-stopping mermaid cake that brings the underwater world to the party table. This easy-to-follow recipe and decorating guide shows you how to make a beautiful themed cake at home without specialty ingredients.
What you’ll learn: simple baking steps for moist cake layers, a silky vanilla buttercream base, and an easy piping technique to create shimmering mermaid scales. The instructions are clear enough for home bakers who want a professional-looking result.
Making your own cake saves money and lets you customize flavors, colors, and decorations. Try a pastel blue buttercream base and accent it with pinks, purples, and aquamarine for a classic mermaid look or swap flavors and hues to suit your celebration.
Ready to make cake magic? Save this recipe, gather your pans, and post a photo of your finished mermaid creation to inspire others. Dive in your gorgeous homemade mermaid cake is within reach.
Mermaid Cake
Equipment
- Round cake pans, stand mixer, mixing bowls, measuring cups, measuring spoons, offset spatula, bench scraper, piping bags, Wilton #5 or #6 piping tips, wire cooling rack, serrated knife, silicone seashell molds, microwave-safe bowl, cake turntable
Ingredients
Cake Layers
- 2½ cups all-purpose flour
- 1½ cups granulated sugar
- 1 tbsp baking powder
- ½ tsp salt
- 1 cup unsalted butter softened
- 4 large eggs
- 1 cup whole milk
- 2 tsp pure vanilla extract
Buttercream
- 1 cup unsalted butter
- 4 cups confectioners’ sugar
- ¼ cup heavy cream
- 1 tsp vanilla extract
- Pinch of salt
Instructions
Decorations
- Turquoise gel food coloring
- Sky blue gel food coloring
- Lavender gel food coloring
- Soft pink gel food coloring
- White chocolate
- Sugar pearls
- Edible glitter
- Sprinkles
Instructions
- Preheat oven to 350°F (175°C).
- Grease and line cake pans with parchment paper.
- Cream butter and sugar until light and fluffy.
- Add eggs one at a time, then vanilla.
- Alternate adding dry ingredients and milk.
- Divide batter between pans.
- Bake for 25–30 minutes.
- Cool completely on wire racks.
- Beat butter for buttercream until creamy.
- Add confectioners’ sugar gradually.
- Mix in cream, vanilla, and salt.
- Divide and color buttercream into ocean-inspired shades.
- Level cake layers and stack with buttercream.
- Apply a crumb coat and chill for 20 minutes.
- Cover cake with blue buttercream.
- Pipe overlapping scales using colored buttercream.
- Create white chocolate seashells and attach to cake.
- Finish with pearls, glitter, and sprinkles.
Notes
- Use gel food coloring for vibrant colors without thinning buttercream.
- Chill the cake before piping scales for cleaner results.
- White chocolate shells can be prepared up to one week ahead.
- Practice piping scales on parchment paper before decorating.
Storage
Store covered in the refrigerator for up to 3 days. Bring to room temperature 30–45 minutes before serving.Nutrition (per serving)
- Calories: 400 kcal
- Carbohydrates: 45 g
- Protein: 4 g
- Fat: 22 g
- Saturated Fat: 13 g
- Sugar: 35 g
- Sodium: 180 mg
Suitable For
Birthday Parties, Mermaid Parties, Baby Showers, Ocean-Themed Celebrations, Children’s Events.Understanding the Mermaid Cake: Your Guide to an Enchanting Birthday Cake

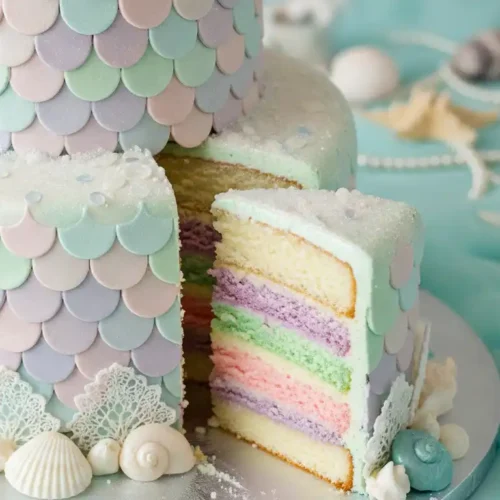
A mermaid cake is a visual centerpiece that captures the shimmer and color of an underwater world. At its heart is a layered cake finished with buttercream and decorated to look like overlapping scales an eye catching cake idea for birthdays, baby showers, and themed events.
At a glance:
- Look: pastel blue buttercream base with accents in pink, purple, and aquamarine; white chocolate seashells and pearl sprinkles for detail.
- Servings: 8-inch round = ~16–20 party slices; 6-inch round = up to 12 slices (see recipe scaling below).
- Difficulty: beginner–intermediate basic piping skills required for the scale effect.
Common palettes include a soft, pastel blue buttercream base paired with ombre piping in pinks, purples, and turquoise to make the scales appear iridescent. Edible accents—white chocolate shells, sugar pearls, and edible glitter—add texture and sparkle so the cake really looks like a mermaid’s tail.
Inspired by mermaid mythology and pop-culture takes like the Little Mermaid, this mermaid birthday cake concept is flexible: choose a vanilla cake with blue buttercream for a classic look, or try a chocolate ombré version for richer flavor and dramatic color contrast.
When searching for a mermaid cake birthday guide, you want clear steps: bake even cake layers, prepare a silky buttercream, tint food coloring to get consistent pastel shades, and practice the overlapping piping technique so the final cake will look like shimmering scales.
Ingredients: Checklist and Quantity Scaling for Your Mermaid Cake

Gather everything before you start: this ingredients checklist is grouped by function (cake layers, buttercream, decorations) so you can tick items off and avoid mid-recipe runs to the store.
Core Ingredients (Cake layers, buttercream & decorations)
- Cake layers — All-purpose flour: 2 ½ cups; Granulated sugar: 1 ½ cups; Baking powder: 1 tbsp; Salt: ½ tsp; Unsalted butter (softened): 1 cup; Eggs: 4 large; Whole milk: 1 cup; Pure vanilla extract: 2 tsp.
- Buttercream — Unsalted butter: 1 cup; Confectioners’ sugar: 4 cups; Heavy cream: ¼ cup; Vanilla extract: 1 tsp; Pinch of salt.
- Decorations — Gel-based food coloring: turquoise, sky blue, lavender, soft pink; White chocolate (for seashells); Sugar pearls, edible glitter, sprinkles as desired.
Allergens: this recipe contains gluten, dairy, and eggs. See substitutions below for gluten-free, dairy-free, or egg-free options.
How to scale this cake
Scaling is straightforward: multiply every ingredient by the same factor. Example: to go from a 6-inch (serves ~12) to a 10-inch (serves ~30), multiply each amount by 2.5. For a quick reference:
- 6-inch round: ~12 servings (base recipe ÷ 1.5)
- 8-inch round: ~16–20 servings (base recipe)
- 10-inch round: ~30 servings (base recipe × 1.5–2)
Note: pan depth and batter height affect bake time; check doneness with a toothpick and adjust baking time as needed.
Quick chocolate variation
Prefer chocolate? Substitute half a cup of cocoa powder for ½ cup of the flour (reduce flour accordingly) and add 2 tbsp brewed strong coffee or hot water to intensify chocolate flavor. Because cocoa absorbs liquid differently, check batter texture — it should be pourable but not runny.
Prep tips & printable checklist
Measure and place ingredients in bowls (mise en place) before you start. Label bowls “cake,” “buttercream,” and “decorations” to speed the workflow. Tip: use gel food coloring for vivid shades without thinning the buttercream. Save or print this checklist so you can take it to the store or the kitchen.
Essential Equipment and Preparation Tips for Baking Your Mermaid Cake
Having the right tools and a tidy workspace makes this mermaid cake project faster and less stressful. Below are must-haves, helpful extras, and quick prep tips so your baking and decorating go smoothly.
Cake Pans, Mixing Tools, and Piping Supplies
- Must-have: Two or three round cake pans of the same diameter (6-inch, 8-inch, or 10-inch) — your choice depends on servings. Use pans with 2–3″ depth for even layers.
- Mixer: Stand mixer with paddle attachment for creaming; a hand mixer is an acceptable substitute.
- Piping bags & tips: At least three disposable or reusable piping bags fitted with small round tips (Wilton #5 or #6 recommended) for the overlapping buttercream scales.
- Smoothing tools: Offset spatula and bench scraper to apply a thin layer of buttercream (crumb coat) and to smooth finishes.
- Molds & melting: Silicone candy molds for white chocolate seashells. Melt chocolate in a microwave-safe bowl in 20–30 second bursts, stirring between intervals.
Prep Time and Cook Time Estimates
- Prep time (measuring, mixing, prepping decorations): ~45 minutes.
- Bake time: ~25–30 minutes per layer (depend on pan size and batter amount).
- Total time including cooling and decorating: plan 3–4 hours from start to finish.
Tips for Prepping Your Workspace and Ingredients
- Clear countertops and set out a “work triangle” with mixing, cooling, and decorating zones.
- Preheat oven to 350°F and use an oven thermometer to confirm accurate temperature.
- Bring butter and eggs to room temperature and measure ingredients in advance (mise en place).
- Line pan bottoms with parchment paper cut to fit exactly for easy release; grease sides lightly if desired.
- Level cooled cakes with a long serrated knife for even round cake stacking — a cake leveler works well if you have one.
Quick troubleshooting & safety
- If layers stick despite parchment, cool completely and freeze for 15–20 minutes; the cake will release more cleanly.
- When melting chocolate, avoid water contact to prevent seizing. Work on a dry surface and use low power in the microwave.
- Optional: a rolling pin is useful for flattening fondant or pressing decorations but isn’t required for buttercream scales.
Step-By-Step Instructions: Baking and Decorating Your Mermaid Cake
Follow this clear, active-step guide to bake moist cake layers, build a silky vanilla buttercream, and decorate an ombré, scale-covered mermaid cake that looks like it came from a bakery.
Baking the Cake Layers
- Preheat the oven to 350°F and prepare your round cake pans by greasing the sides and lining the bottoms with parchment paper circles for easy release.
- Cream room-temperature unsalted butter with granulated sugar until pale and fluffy (about 3–4 minutes with an electric mixer on medium).
- Add eggs one at a time, beating after each addition. Stir in pure vanilla extract.
- Alternately add the dry ingredients and whole milk in three additions, beginning and ending with the flour mixture; mix until just combined to avoid overworking the batter.
- Divide batter evenly between pans and bake 25–30 minutes (test with a toothpick — it should come out clean). Let layers cool in pans for 10 minutes, then transfer to wire racks to cool completely.
Preparing and Applying the Buttercream
- Beat unsalted butter until creamy. Gradually add confectioners’ sugar, then mix in heavy cream, vanilla extract, and a pinch of salt until the buttercream mix is smooth and can hold soft peaks.
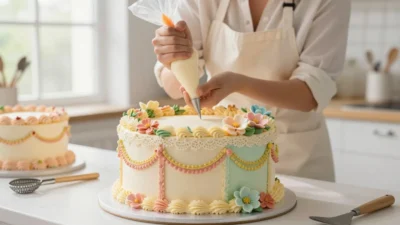
- Divide buttercream into bowls and tint with gel food coloring — reserve one bowl of blue buttercream for the base and tint the rest in pink, purple, and turquoise for piping the scales.
- Level cooled cake layers with a long serrated knife so each layer stacks evenly. Place the first layer on a turntable or serving board.
- Spread a generous layer of buttercream between layers, stacking as you go. Apply a thin layer of buttercream all over the cake as a crumb coat (a thin layer that seals crumbs).
- Chill the crumb-coated cake for about 20 minutes so the thin layer sets and makes piping cleaner and easier.
Creating the Mermaid Scale Effect with Piping Techniques
- Fit a piping bag with a small round tip (Wilton #5 or #6) and fill it with one color of buttercream. Hold the bag steady and pipe overlapping half-circles in a vertical column from the base upward — each new half-circle should slightly overlap the one above it so the columns read like scales.
- Offset the next column so each scale sits between two in the previous column; continue around the cake, switching colors for an ombré or rainbow effect so the cake appears iridescent and like real scales.
- Practice steady pressure and consistent spacing on parchment paper first. If a scale looks uneven, gently nudge it with the back of a spoon or a small offset spatula to refine the shape while the buttercream is still soft.
Adding Finishing Touches: Shell Decorations and Color Accents
- Melt white chocolate in a double boiler or microwave in 20–30 second bursts, stirring between intervals. Spoon melted chocolate into silicone seashell molds, tap to remove air bubbles, and chill until set (about 15 minutes).
- Arrange white chocolate shells around the base or cluster them on top. Add sugar pearls, edible glitter, or sprinkles to enhance the ocean look. Consider a mermaid tail topper for a dramatic focal point.
- Use a star tip to pipe decorative borders along the bottom edge and top rim in blue buttercream or a contrasting pastel color for a polished finish.
- Pro tip: If your buttercream gets too soft while piping, pop the piping bag in the fridge for 10 minutes. If it’s too stiff, stir in 1 teaspoon of heavy cream at a time until you reach the desired piping consistency.
Quick timeline example: bake three layers (including prep) ~1.5 hours; cool and level ~30–45 minutes; build, crumb coat, chill, and pipe scales ~60–90 minutes. Save this cake recipe and share a photo of your mermaid cake birthday creation — your homemade mermaid cake will surely steal the show.
Additional Tips: Notes, Storage, and Nutrition Facts
These quick notes and storage tips help your mermaid cake stay fresh and make the decorating process less stressful. Save this section as a reference for substitutions, make-ahead steps, and serving advice.
Allergy substitutions & recipe variations
- Gluten-free: Substitute a 1:1 gluten-free all-purpose flour blend for the regular flour. Texture may vary slightly—watch bake time and test with a toothpick.
- Dairy-free: Use plant-based butter and oat or almond milk in place of dairy. Choose dairy-free white chocolate for shells; keep in mind dairy-free chocolates can be more sensitive to heat.
- Egg-free: Replace each egg with 1 tbsp ground flaxseed mixed with 3 tbsp water (let sit 5 minutes) or 1/4 cup unsweetened applesauce. Expect a slightly denser crumb.
- Chocolate option: For a chocolate variant, swap half a cup of flour for 1/2 cup unsweetened cocoa powder and add 2 tbsp brewed coffee or hot water to boost chocolate flavor. Adjust batter consistency as cocoa can absorb liquid differently.
- Allergen caution: Many white chocolate and sprinkle products are processed on equipment that handles nuts—always check labels if nut allergies are a concern.
Storage & make-ahead tips
- Short-term: Store a frosted mermaid cake in an airtight container or cover loosely with plastic wrap. In cool rooms, room temperature for up to 1–2 days is fine; refrigerate if your kitchen is warm. (Refrigeration length: up to 3 days.)
- Before serving: Remove refrigerated cake 30–45 minutes before serving so the buttercream softens and flavors shine through.
- Freezing layers: Unfrosted cake layers freeze best—wrap each layer tightly in plastic wrap and foil; freeze up to one month. Thaw overnight in the refrigerator before leveling and decorating.
- Make decorations ahead: White chocolate shells can be made up to a week in advance and kept in an airtight container in the fridge. This breaks the project into manageable steps.
- Crumb coat benefit: The thin layer buttercream crumb coat seals in moisture so the cake stays tender even after refrigeration.
Practical tips for piping, fixing gaps, and slicing
- If your buttercream softens while piping, chill the piping bag for 10 minutes. If it’s too stiff, add 1 tsp heavy cream at a time until you reach the right buttercream mix consistency.
- To make the cake look like scales where piping is uneven, gently reshape individual scales with a small offset spatula or the back of a spoon.
- Use a clean, sharp serrated knife for slicing. Wipe the blade between cuts with a damp paper towel for clean edges that show off the cake layers and scale decorations.
- A rolling pin is handy if you include fondant accents or need to flatten decorations, but it’s optional for a buttercream-only finish.
Nutrition snapshot (approximate)
Per slice (8-inch round cut into 20 slices): ~380–420 calories, ~22 g fat, ~45 g carbohydrates, ~4 g protein. Values vary with substitutions and portion sizes—note these are estimates for planning only.
Save recipe notes: jot down any ingredient swaps or timing changes you make so you can replicate a version that matched your taste. Post a photo of your finished mermaid cake to inspire others and keep this guide handy for your next baking adventure.
Conclusion: Crafting Your Perfect Mermaid Cake Every Time
You’ve followed a full, practical path—from gathering ingredients and tools to baking layers, mixing a silky vanilla buttercream, and piping shimmering scales. Expect to spend about 3–4 hours from start to finish; the project is beginner–intermediate and a great way to learn transferable decorating skills.
Making a mermaid cake at home saves money, lets you customize flavor, color, and size, and produces a memorable centerpiece for a mermaid birthday or themed party. Accept small imperfections—they add charm and show that your cake was lovingly made.
Ready to try this cake idea? Save this mermaid cake recipe, pin it for later, and post a photo with #MermaidCake when you’re done. Whether you’re piping scales or placing a mermaid tail topper, this is a fun way to make a cake that truly stands out.
You may also enjoy these recipes:
- How to Make Watermelon Cake Perfect for Summer Parties
- How to Make the Miami Vice Cocktail Drink Recipe Easily
FAQ
What makes a mermaid cake special?
A mermaid cake stands out for its vibrant pastel colors, overlapping scale piping, and ocean-themed decorations like white chocolate shells and pearl sprinkles — perfect for a mermaid birthday or themed celebration. Tip: chill the crumb coat 20 minutes before piping for cleaner scales.
What ingredients do I need for a mermaid cake?
Basic ingredients include flour, sugar, eggs, butter, vanilla, and gel food coloring for tinting buttercream. You’ll also want confectioners’ sugar and heavy cream for the buttercream, plus white chocolate and sprinkles for decorations.
How can I achieve the scale effect on my cake?
Use a piping bag fitted with a small round tip and pipe overlapping half-circles in vertical columns, offsetting each column so the scales sit between those in the previous column. Practice on parchment first — steady pressure and consistent spacing make the scales look like real fish scales.
What tools are essential for baking and decorating?
Key tools: round cake pans, mixing bowls and a mixer, piping bags and small round tips (Wilton #5/#6), an offset spatula and bench scraper, and a long serrated knife for leveling. A rolling pin is optional for fondant accents.
How should I store my mermaid cake?
If your kitchen is cool, a frosted buttercream cake can sit covered at room temperature for 1–2 days; otherwise refrigerate (up to 3 days). Always bring refrigerated cake to room temperature 30–45 minutes before serving for best flavor and texture.
Can I make a mermaid cake ahead of time?
Yes: bake and freeze unfrosted layers (wrap tightly in plastic and foil) for up to one month. Thaw in the fridge overnight before decorating. Decorations like white chocolate shells can be made up to a week ahead and refrigerated.
Are there any common allergies to consider?
Common allergens in this recipe include gluten, dairy, and eggs. For guests with allergies, use a gluten-free flour blend, plant-based butter and milk, or egg replacements as described in the recipe variations.