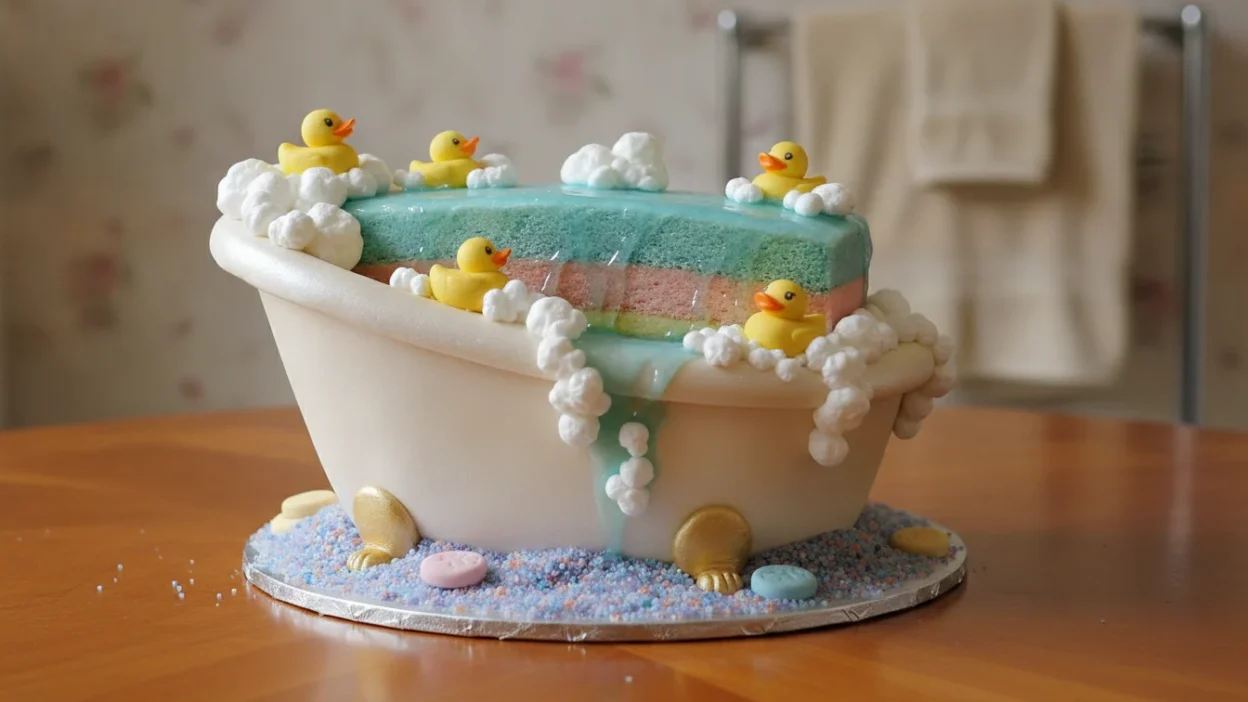
Ever thought a simple dessert could make a party unforgettable? Picture a cake shaped like a bathtub, with fizzy frosting and candy bath bombs. It’s more than a cake; it’s a fun experience!
The bath day cake is a hit for birthdays, bridal showers, and self-care parties. Its playful look captures the joy of relaxation and fun. It’s the perfect centerpiece for any celebration.
In this guide, we’ll share bath day cake ideas to spark your creativity. We’ll cover everything from the cake base to the final touches. Get ready to surprise your guests with a cake that’s as fun to make as it is to eat!

Bath Day Cake
Equipment
- Mixing bowls, stand mixer, cake pans, serrated knife, cooling rack, offset spatula, cake turntable, fondant smoother, piping bags, decorating tips, modeling tools, small paintbrush
Ingredients
- 3 cups all-purpose flour
- 2 cups sugar
- 4 eggs
- 1 cup unsalted butter
- 2 teaspoons baking powder
- 1 cup milk
- 2 teaspoons vanilla extract
- 1 teaspoon citric acid
- 1 teaspoon baking soda
- 4 cups powdered sugar
- 2 tablespoons heavy cream
- Gel food coloring
- Fondant decorations
- Candy melts
- Agar-agar optional
- Natural flavor extracts
Instructions
- Preheat oven and prepare cake pans.
- Mix butter and sugar until light and fluffy.
- Add eggs one at a time.
- Alternate adding dry ingredients and milk.
- Bake until a toothpick comes out clean.
- Cool completely on a wire rack.
- Prepare the fizzy frosting by combining butter, powdered sugar, cream, citric acid, and baking soda.
- Color frosting as desired.
- Carve the cake into a bathtub shape.
- Cover and frost the cake.
- Add fondant decorations, bath bombs, bubbles, and water effects.
- Serve and enjoy.
Notes
- Make cake layers one day in advance for easier carving.
- Use natural extracts instead of alcohol-based flavorings.
- Agar-agar can replace gelatin for decorative effects.
Nutrition
- Calories: 420 kcal
- Carbohydrates: 58 g
- Protein: 5 g
- Fat: 18 g
- Saturated Fat: 10 g
- Cholesterol: 85 mg
- Sodium: 180 mg
- Sugar: 42 g
- Fiber: 1 g
Storage
Store covered in the refrigerator for up to 3 days. Bring to room temperature before serving.Suitable For
Birthday Parties, Bridal Showers, Mother’s Day, Spa-Themed Events, Girls’ Night Celebrations.1. What is a Bath Day Cake and Why You Need One
Imagine a cake that captures the essence of relaxation and joy a Bath Day Cake does just that. It looks like a bathtub filled with bubbles, bath bombs, and accessories, all made from food. It’s more than just a cake; it’s a celebration of self-care and creativity.
The Bath Day Cake is a delightful representation of the broader trend of cake as art. Bakers are turning simple sponges into intricate sculptures, making baking an art form. This cake invites you to celebrate life’s special moments with indulgence.
The Creative Inspiration Behind Themed Cakes
The inspiration for themed cakes often comes from personal experiences and cultural trends. The Bath Day Cake draws heavily from the popularity of bath bomb recipes and self-care rituals. It encourages you to take a moment for yourself, making it a perfect centerpiece for any gathering.
Perfect Occasions for a Bath Day Cake
When can you enjoy a Bath Day Cake? Here are some perfect occasions:
- A child’s spa-themed birthday party
- A bridal shower, celebrating the bride-to-be
- Mother’s Day, honoring the special women in your life
- A girls’ night in, adding a touch of fun and creativity
This cake isn’t just dessert; it’s an experience that sparks joy and conversation. The Bath Day Cake is a must-have for anyone who loves artistic cake creations and wants to make their celebration unforgettable.

2. Essential Tools and Equipment for Your Bath Day Cake
To make a stunning Bath Day Cake, you need the right tools. Having the essential equipment makes the process smoother. It also makes baking more enjoyable. Below, we list the core baking tools and sculpting and decoration tools for that perfect bathtub shape.
Core Baking Equipment
First, let’s cover the basics. Here are the must-have tools for your Bath Day Cake:
- Mixing Bowls: A set of various sizes makes mixing easy.
- Stand or Hand Mixer: A good mixer is key for a smooth batter.
- Cake Pans: Rectangular pans are best for carving your cake.
- Serrated Knife: This knife is great for carving and leveling your cake layers.
- Cooling Rack: Proper cooling is vital for your cake’s structure.
Sculpting and Decoration Tools
After baking and cooling, it’s time to decorate. Here are the tools you’ll need:
- Offset Spatulas: Perfect for spreading frosting smoothly.
- Turntable: A rotating cake stand makes decorating easier.
- Fondant Smoothers: These tools help achieve a flawless finish.
- Piping Bags with Various Tips: Essential for adding details.
- Modeling Tools: Useful for creating fondant details that look like bath accessories.
- Small Paintbrush: Great for applying edible luster dust for a shimmering effect.
While specialty items can improve your cake-making, many tools can be made from common household items. This makes creating a Bath Day Cake accessible, even for beginners in 3D cake sculpting. With the right tools, you’ll be on your way to creating a masterpiece that shows your creativity and skill.

3. Understanding Your Bath Day Cake Ingredients
The key to a great Bath Day Cake is its ingredients. The right mix can change the taste and look. We’ll show you how to pick a solid cake base and decorations that fit your theme.
Choosing the Right Cake Base Recipe
You can choose from vanilla, chocolate, or funfetti for your cake base. But, a denser recipe like pound cake is best for carving. It keeps its shape well, making designs easier.
For a Bath Day Cake that looks and tastes amazing, try these base recipes:
- Pound Cake
- Vanilla Cake
- Chocolate Cake
- Funfetti Cake
These recipes are tasty and sturdy, perfect for your cake’s unique shape.
Selecting Safe and Edible Decorations
Decorations let you get creative. Use candy melts for soap bars and fondant for bath bombs. Isomalt is great for water effects.
Choose decorations wisely to keep your cake safe and tasty. Avoid pork products and alcohol-based flavors. Instead, use plant-based options like agar-agar or vanilla extract. This makes your cake halal-friendly for everyone.
Want a bath bomb recipe? Make fizzy frosting that smells like real bath fizzies. Use fruit juices or oils for scents. Your cake will look and taste like a custom ice cream cake, but in a bathtub shape.
4. Preparing Your Workspace for Cake Success
To make a perfect bath day cake, start with a clean workspace. A tidy area makes you more efficient and improves your cake’s quality. It’s also key to follow food safety rules for a great baking experience.
Sanitation and Food Safety Guidelines
Before baking, make sure your workspace is clean. Here are some important steps:
- Wash your hands well with soap and water before touching ingredients.
- Sanitize surfaces where you’ll work, like countertops and cutting boards.
- Keep perishable ingredients cold until you’re ready to use them.
- Avoid mixing different things by using separate tools for each.
Following these steps makes your baking area safe and ready for fun.
Setting Up Your Decoration Station
Your decoration station is where the magic happens. Here’s how to set it up for success:
- Put your tools where you can easily reach them to save time.
- Fill your piping bags with frosting before you start decorating.
- Have your “cake skin” ready, like fondant or buttercream, for a pro finish.
- Use a lazy Susan for easy access to all sides of your cake.
- Cover your work surface with parchment paper for easy cleanup.
With a well-prepped station, you can focus on making your bath day cake beautiful. This setup helps you create a stunning cake, just like in a professional bakery.
5. Baking the Perfect Cake Base
Making a great bath day cake begins with a solid cake base. This base is key for the right texture and taste. Here, you’ll learn how to mix your batter and bake and cool it perfectly.
Mixing Your Batter
To get a soft crumb, start by creaming butter and sugar until it’s light and fluffy. This step adds air, making your cake rise well. Then, add eggs one at a time, mixing well after each.
After your wet ingredients are mixed, add the dry ones. Mix dry and wet ingredients alternately, starting and ending with dry. This avoids a dense cake. Your batter should be smooth but okay with small lumps.
Baking and Cooling Techniques
Choosing the right pan size is key for even baking. A 9-inch round cake pan is good, but grease and flour it to avoid sticking. Preheat your oven to 350°F (175°C). Check if the cake is done by inserting a toothpick into its center; it should come out clean or with a few moist crumbs.
After baking, let the cake cool in the pan for 10 minutes before moving it to a wire rack. This step prevents the cake from getting soggy. Let it cool completely before you handle it. If you’re in a hurry, bake the cake a day ahead. This helps the layers settle and makes assembly easier.
Even if your cake isn’t perfect, don’t worry. Carving and frosting will cover any flaws. Your bath day cake will become a beautiful centerpiece, showing off your creativity and hard work.
6. Creating the Signature Bath Bomb Frosting
Turn your cake into a bath day wonder with fizzy buttercream frosting. This topping makes your cake look great and taste amazing. It’s like a bath bomb in frosting form, adding fun to your celebration.
To make this special frosting, mix citric acid and baking soda into American buttercream. This mix creates a slight fizz, like a bath bomb. Here’s how to make your fizzy buttercream base:
Making the Fizzy Buttercream Base
- Start with 1 cup of unsalted butter, softened.
- Add 4 cups of powdered sugar, mixing until smooth.
- Incorporate 2 tablespoons of milk and 1 teaspoon of vanilla extract.
- Lastly, mix in 1 teaspoon of citric acid and 1 teaspoon of baking soda.
Mix well until it’s light and fluffy. The fizz starts when you mix citric acid and baking soda. So, pipe it on your cake quickly!
Coloring and Scenting Your Frosting
Now, let’s add color and scent. Use gel food colors for bright, bath-like colors. Pick soft blues, greens, or pink for a relaxing vibe.
For flavor, choose natural extracts or fruit zests. Stay away from alcohol-based flavors for a clean taste. Good choices include:
- Lemon zest for a refreshing citrus flavor.
- Lavender extract for a calming aroma.
- Vanilla extract for a classic sweet taste.
After coloring and scenting, decorate your cake. Use piping bags for bubbles, swirls, and “soap suds.” This frosting makes your cake look and taste amazing, turning it into a artwork cake everyone will adore.
7. Sculpting and Shaping Your Bath Day Cake
Turning your cake into a bathtub shape is a fun creative journey. It’s your chance to make your cake a work of art. Start by leveling the cake layers for a stable base. A flat surface is key for sculpting.
Then, cut a rectangular block from the cake to form the bathtub body. Hollow out the center to make the tub basin. Aim for gentle curves like a real bathtub. This step needs precision, so take your time.
Carving the Cake Body
When carving the cake body, aim for smooth edges. Use a serrated knife for better control. If you make a mistake, you can fix it with extra frosting. This is where your artistic skills shine, like in a beauty beast cake or a beauty and the beast cake.
Building the Bathtub Shape
After carving, stack the layers and hold them with buttercream. Use dowels for extra stability if needed. This keeps your cake from collapsing.
To get a porcelain finish, cover the cake with fondant. This gives your bathtub a sleek look. With patience and practice, you can make a stunning bath day cake sculpture that will wow everyone!
8. Adding Artistic Details and Decorations
The secret to a memorable bath day cake is in its artistic details. These touches can turn your cake into a stunning centerpiece. Here are some creative ideas to make your cake stand out.
Creating Realistic Water Effects
To make your cake look like a filled tub, use tinted gelatin or piping gel. These can mimic water beautifully. Here’s how to do it:
- Tinted Gelatin: Follow the package instructions to prepare gelatin. Add a few drops of blue food coloring. Pour it over the cake once it cools.
- Piping Gel: Use piping gel for a glossy finish that looks like water. Add edible glitter for sparkle.
- Bubbles: Add mini marshmallows or meringue kisses to represent bubbles.
Adding Bath Accessories and Toppers
Now, let’s talk about adding fun bath accessories and toppers. These can make your cake unique and personal:
- Edible Bath Bombs: Make these from cake pops for a playful touch.
- Loofah: Use shredded coconut to create a realistic loofah effect.
- Rubber Ducky: Mold a cute rubber ducky from fondant to float on your cake.
- Bath Day Cake Topper: Add a custom topper, like a name or a tiny spa sign, for a special touch.
These small details can make your bath day cake special, just like custom ice cream cakes. Remember, personalization is key. Choose decorations that fit the occasion and your loved ones’ tastes.
9. Complete Bath Day Cake Recipe Card
Making a memorable Bath Day Cake is simple with this recipe card. You’ll find all the details you need to bake, decorate, and enjoy this dessert. Prep time, serving suggestions, and more are all included!
Recipe Details
- Prep Time: 45 minutes
- Cook Time: 35 minutes
- Total Time: 1 hour 20 minutes plus cooling
- Servings: 12-16
- Course: Dessert
- Cuisine: American
- Calories: Approximately 420 per serving
Ingredients Checklist with Scaling Options
Here’s your ingredient list, with options to scale the recipe. Choose between 1x, 2x, or 3x batches, and the quantities will adjust automatically!
- All-purpose flour
- Sugar
- Eggs
- Butter
- Baking powder
- Milk
- Vanilla extract
- Citric acid
- Baking soda
- Powdered sugar
- Heavy cream
- Gel food coloring
- Edible decorations (fondant, candy melts)
No pork-derived gelatin or alcohol-based flavorings are used. Instead, agar-agar and natural extracts are options.
Step-by-Step Instructions
- Preheat your oven and prepare the cake pans.
- Mix the batter until smooth and well combined.
- Bake the cake layers and let them cool completely.
- Prepare the fizzy frosting while the cake cools.
- Carve the cooled cake into a tub shape for a realistic look.
- Frost the cake generously and decorate as desired.
- Add water effects and any toppers to complete your design.
Notes, Storage Tips, and Nutrition Facts
Notes: For best results, make the cake layers a day ahead of time.
Storage Tips: Store in the refrigerator for up to 3 days. Let the cake come to room temperature before serving for the best flavor.
Nutrition Facts: Each serving has about 420 calories. Fat, carbs, and protein details are available upon request.
10. Conclusion
Making a bath day cake is more than baking. It’s a chance to show off your creativity. This special cake can make any celebration unforgettable. You can use colors, scents, and toppings to make it your own.
Whether you go for a spa theme or a fun bubble bath look, the choices are endless. The skills you learn, like sculpting and frosting, are useful for many cakes. You can make everything from playful birthday cakes to beautiful wedding desserts.
When you share your bath day cake, it brings happiness to those around you. Every cake has a story to tell. Invite others to see your creativity and enjoy the journey of baking.
You may also enjoy these recipes:
FAQ
What is a bath day cake?
A bath day cake is a fun, bathtub-shaped dessert. It looks like a spa treat, with fizzy frosting and candy bath bombs. It’s great for birthdays, bridal showers, and self-care days.
How do I make a bath day cake?
To make a bath day cake, start with a cake base like vanilla or chocolate. Bake and cool it, then shape it into a bathtub. Frost it with fizzy buttercream and decorate with fondant bath bombs and candy melts.
What tools do I need for sculpting a bath day cake?
You’ll need mixing bowls, a stand or hand mixer, and cake pans. For sculpting, use offset spatulas, a turntable, and fondant smoothers. Don’t forget piping bags and modeling tools for details.
Can I customize my bath day cake?
Yes! Customize your cake with colors, scents, and decorations. Add a personal cake topper or unique edible bath accessories. It will make your cake special and unique.
What ingredients should I use for the frosting?
For fizzy buttercream, mix citric acid and baking soda into American buttercream. Use gel food colors for bright colors and natural flavorings like lemon or vanilla. This way, you avoid alcohol-based extracts.
How do I create realistic water effects on my cake?
Use tinted gelatin or piping gel for water effects. Mini marshmallows or meringue kisses can look like bubbles. This adds to your cake’s realistic look.
Is it possible to make a bath day cake that is dietary-friendly?
Yes, use plant-based alternatives for gelatin and avoid alcohol-based flavorings. Make sure all decorations and ingredients fit your dietary needs, like halal options.
How long can I store my bath day cake?
Store your cake in the fridge for up to three days. Let it come to room temperature before serving. This will improve its flavors and texture.
What occasions are suitable for a bath day cake?
Bath day cakes are great for many occasions. They’re perfect for spa-themed birthday parties, bridal showers, Mother’s Day, or girls’ nights in. They add a fun touch to any celebration.