Imagine walking into a room full of laughter, the scent of vanilla frosting and colorful sprinkles in the air. At the center of the table sits a vibrant, whimsical centerpiece part dessert, part decoration that instantly lifts spirits.
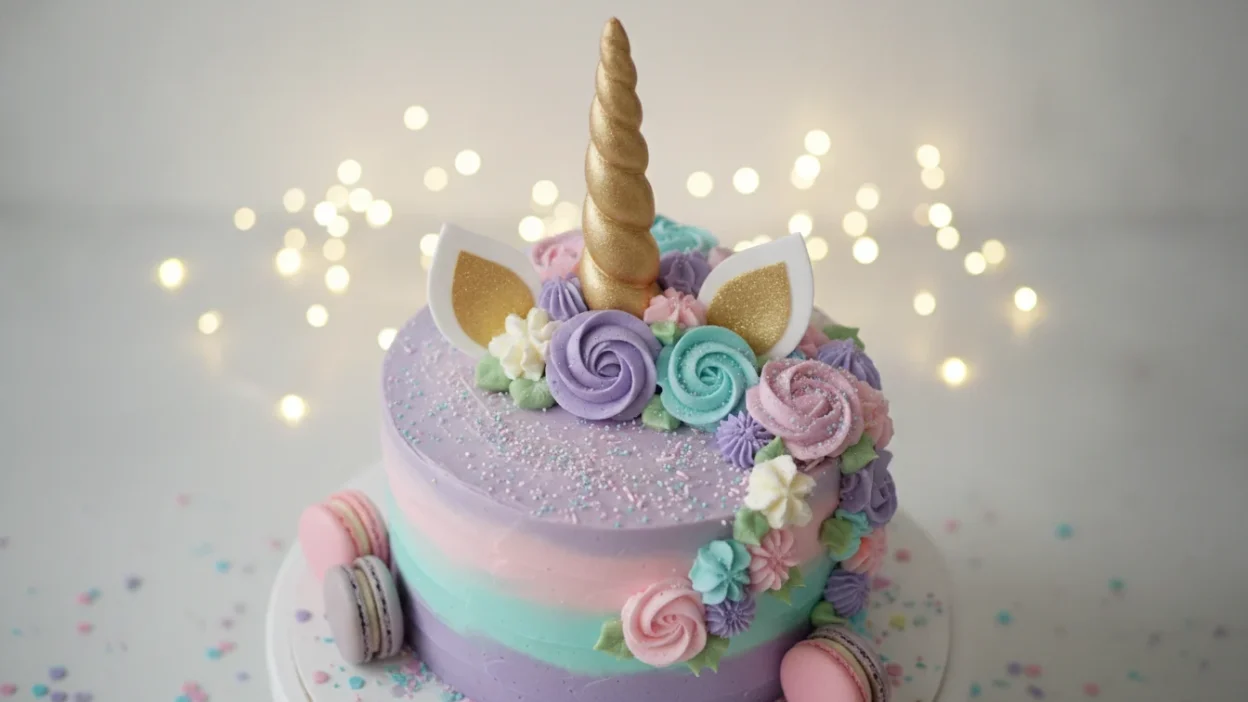
This isn’t just any dessert; it’s a true showstopper. Unicorn cake turn ordinary birthday moments into memorable celebrations for kids and adults alike. With a gold horn, pastel mane, delicate ears, and a surprise rainbow interior, these cakes feel like edible fairy tales.
In this guide you’ll find everything to make a unicorn cake at home: a reliable recipe and timing, decorating techniques (buttercream and fondant), topper ideas, and party-planning tips to match your theme. Whether you want a quick, simple design or an elaborate rainbow unicorn masterpiece, the steps are designed for home bakers of every skill level.
Ready to make unicorn magic? Read on for a step-by-step recipe, decorating tips, and party ideas that will wow your guests and help you make unicorn cake memories that last.
Unicorn Cake
Equipment
- 8-inch cake pans, mixing bowls, electric mixer, measuring cups and spoons, piping bags, Wilton 1M piping tip, offset spatula, cake turntable, bench scraper, serrated knife or cake leveler, cooling racks,
Ingredients
- 2½ cups 312 g all-purpose flour
- 2 cups 400 g granulated sugar
- 1 tbsp baking powder
- 1 tsp baking soda
- ½ tsp salt
- 1 cup 226 g unsalted butter
- 4 large eggs
- 1 cup 240 ml whole milk
- 2 tsp clear vanilla extract
- Gel food coloring pink, blue, purple, yellow, teal
- Vanilla buttercream frosting
- Sprinkles and edible glitter
Instructions
- Preheat oven to 350°F (175°C).
- Grease and line five 8-inch cake pans.
- Cream butter and sugar until fluffy.
- Add eggs one at a time, then vanilla.
- Mix dry ingredients separately.
- Alternate adding dry ingredients and milk.
- Divide batter and color each portion.
- Pour into pans and bake 25–30 minutes.
- Cool completely.
- Level cake layers.
- Stack with buttercream between layers.
- Apply crumb coat and chill.
- Frost smoothly.
- Decorate with unicorn mane, horn, ears, and sprinkles.
Notes
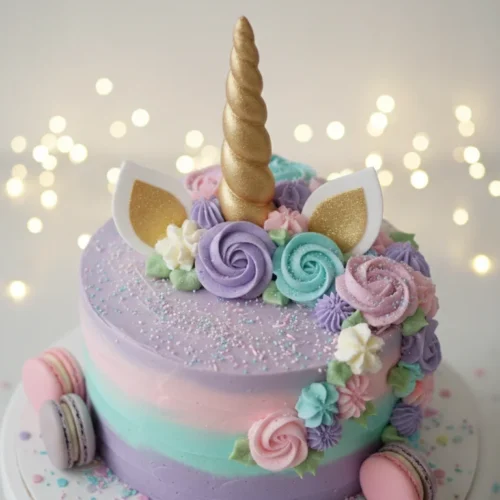
1. The Magic of Unicorn Cakes: What Makes Them Special

Unicorn cakes are more than desserts they’re visual centerpieces that turn birthdays into memorable celebrations. Their bright pastel frosting, playful shapes, and surprise rainbow layers make them instantly shareable and fun for guests of all ages.
Why Unicorn Cakes Are Perfect for Birthday Celebrations
Unicorns have become a cultural motif across kids’ shows, fashion, and party trends. Combined with eye-catching frosting and colorful interiors, a well-executed unicorn cake becomes both a sweet treat and a photo-ready focal point at any birthday party.
The Rise of Unicorn-Themed Parties
Social platforms helped popularize unicorn-themed gatherings, where cakes play a starring role. The emphasis on bright colors and whimsical details makes these cakes especially Instagram worthy and great for capturing party moments.
Visual Appeal and Shareable Designs
Rather than calling each creation a masterpiece, focus on what makes them shareable: clean exterior frosting, a striking horn or topper, and a colorful interior that surprises when sliced.
Key Visual Elements to Plan Before Baking
A simple checklist helps you plan the look before you bake.
- Layers: Decide on 3–5 colored layers (a 5-layer pastel interior is a popular choice).
- Exterior: Choose white or pastel buttercream for contrast and easy photo styling.
- Topper: Plan a gold-look horn (use edible luster dust, not real gold) and ears from fondant or buttercream.
- Details: Sprinkles, edible glitter, and a flowing buttercream mane add finishing touches.
Rainbow Layers and Vibrant Colors
Rainbow layers (ROYGBIV or a pastel variant) create a joyful interior surprise. Use gel food coloring for saturated hues while keeping batter consistency steady.
Signature Horn and Ear Decorations
The signature horn and ears define the unicorn look. Make a golden-looking horn with edible luster dust over chocolate or isomalt, and craft matching ears in fondant or piped buttercream to complete the theme.
| Element | Description | Importance |
| Rainbow Layers | Multi-colored cake layers that create a vibrant interior. | Surprise and delight when cut, enhancing the experience. |
| Pastel Frosting | Soft, colorful buttercream that adds a whimsical touch. | Visually appealing and enhances the magical theme. |
| Unicorn Horn | Edible, gold-colored sculpted horn that serves as a focal point. | Defines the unicorn theme and adds elegance. |
| Fondant Ears | Decorative ears made from fondant or buttercream. | Completes the unicorn look, enhancing visual impact. |
2. Essential Tools and Ingredients for Making a Unicorn Cake
To bake and decorate a show-stopping unicorn cake, gather the right tools and ingredients before you start. Below are compact, scannable checklists and a few pro tips so you can focus on creating colorful layers and a flawless finish.
Must-Have Baking Equipment
Essential equipment for smooth workflow:
- Cake Pans and Mixing Bowls: Use 6-inch or 8-inch round cake pans (8″ works well for 3–5 layers). Have multiple mixing bowls to divide cake batter into colors.
- Piping Bags and Decorating Tips: Sturdy disposable or reusable piping bags plus a few tips — Wilton 1M (rosettes), round tips for eyes/lines, and a small petal tip for details.
Essential extras: turntable, bench scraper, offset spatula, serrated knife or cake leveler, parchment rounds, cooling racks, and an oven thermometer.
Key Ingredients for the Cake Base
Simple, reliable pantry ingredients are the foundation:
- Dry: all-purpose flour, granulated sugar, baking powder, baking soda, and salt.
- Wet: unsalted butter (or plant-based butter), eggs (or flax eggs for egg-free), whole milk or oat milk, and clear vanilla extract for neutral color and classic flavor.
Pro tip: measure flour by weight for consistent cake texture.
Coloring Agents and Flavorings
Make your layers pop without changing batter texture:
- Gel Food Coloring: Gel or paste colorings give saturated hues without thinning the cake batter ideal for rainbow layers.
- Flavorings: clear vanilla helps keep pale colors true; add a little almond or citrus extract for subtle variation.
Quick checklist before you start: prep pans and parchment, pre-measure dry and wet ingredients, set out bowls for dividing cake batter, and have your piping bags and tips ready. Gathering everything first saves time and improves results when you make cake.
3. How to Make a Unicorn Cake: Complete Recipe
Ready to add unicorn magic to your kitchen? This complete unicorn cake recipe is written for home bakers and includes timing, ingredient scaling, and tips to get colorful, even layers and a smooth buttercream finish. Choose the full five-layer rainbow for a dramatic reveal or an easier three-layer version if you’re short on time.
3.1 Unicorn Cake Recipe Card
| Prep Time | Cook Time | Total Time |
| 45 minutes (active prep) | 25–30 minutes per pan (bake in batches if you have fewer pans) | Approximately 3 hours (includes cooling, leveling, and decorating) |
| Servings | Course | Cuisine |
| 12–16 servings (5-layer 8″ cake) — adjust if you make 3 layers | Dessert | American |
| Calories | Nutrition Information | |
| Approx. 300 calories per slice | Estimate varies by portion size and ingredients |
3.2 Ingredients Checklist with Scaling Options
- Dry Ingredients: 2 ½ cups (312 g) all-purpose flour, 2 cups (400 g) granulated sugar, 1 tbsp baking powder, 1 tsp baking soda, ½ tsp salt.
- Wet Ingredients: 1 cup (226 g) unsalted butter (or plant-based butter), 4 large eggs (or 4 flax eggs for egg-free), 1 cup (240 ml) whole milk or oat milk, 2 tsp clear vanilla extract.
- Coloring & Flavoring: Gel food coloring in pink, blue, purple, yellow, teal (oil-based or gel for chocolate; gel/paste for cake batter).
Scaling note: this batch makes five 8-inch layers. For a simpler 3-layer cake, divide the batter into three colors and bake in three 8-inch pans; bake time remains similar.
3.3 Step-by-Step Instructions
- Preheat oven to 350°F (175°C). Position racks mid-level. Grease and line five 8-inch round cake pans (or reuse 3 pans and bake in batches).
- In a large bowl, cream butter and sugar until light and fluffy (about 3–4 minutes with a mixer).
- Add eggs one at a time, beating well after each addition. Mix in vanilla.
- In a separate bowl, whisk together flour, baking powder, baking soda, and salt.
- Alternate adding dry ingredients and milk to the butter mixture, beginning and ending with dry ingredients. Mix just until combined — avoid overmixing.
- Divide the cake batter evenly into bowls for each color. Tint each portion with gel food coloring until you reach the desired pastel or vibrant shade.
- Pour each colored batter into prepared pans (fill each pan about 2/3 full). Bake 25–30 minutes, or until a toothpick inserted in the center comes out clean. If baking fewer pans, rotate pans halfway through.
- Cool pans on wire racks for 10 minutes, then unmold to cool completely. For best results, chill layers in the fridge for 30–60 minutes before leveling and stacking.
- Level each layer with a serrated knife or cake leveler. Place the first layer on a cake board or turntable, spread a thin layer of vanilla buttercream, then stack subsequent layers.
- Apply a thin crumb coat of buttercream and chill 20–30 minutes. Finish with a smooth final coat of buttercream. Add piped mane, sprinkles, and your horn/ears toppers.
3.4 Recipe Notes and Tips
3.4.1 Pro Tips & Troubleshooting
- Oven temp & doming: Use an oven thermometer — uneven heat causes domed layers. Reduce temperature by 25°F if layers brown too quickly.
- Color bleeding: Cool layers completely and chill before stacking to prevent colors from running into the buttercream.
- Testing doneness: Toothpick should come out with a few moist crumbs or use an instant-read thermometer; cake is done at ~200–205°F (93–96°C).
3.4.2 Dairy-Free or Egg-Free Options
Substitute plant-based butter and use oat or almond milk. For egg-free, use flax eggs (1 tbsp ground flax + 3 tbsp water = 1 egg) — note texture will be slightly different. Always label cakes when serving guests with allergies.
3.4.3 Quick Alternatives
- Beginner option: Make a 3-layer 8″ cake (fewer colors), or bake 24 cupcakes for a pull-apart unicorn display.
- Make-ahead: Bake and freeze layers up to 1 month (wrap tightly in plastic and foil). Defrost in the fridge before assembling.
4. Creating the Perfect Unicorn Horn and Ears
The horn and ears are what instantly read “unicorn” from across the room. Make them sturdy, food-safe, and visually striking and plan a little extra time so they set properly before you place them on the cake.
Making a Chocolate or Isomalt Unicorn Horn
Two popular methods produce different looks: white chocolate gives flavor and opacity; isomalt gives a glassy, translucent finish. Both can be painted with edible gold luster for that classic golden horn effect (use only food-grade luster dust).
Step-by-Step Horn Construction
- Make a cone mold from parchment paper or use a cone-shaped silicone mold.
- Melt white chocolate (temper if you want a glossy finish) or carefully prepare isomalt following manufacturer instructions — work in a well-ventilated area and beware hot sugar.
- Pipe or pour the melted material into the cone mold, creating a spiral pattern as you go to form the signature twist.
- Let the horn cool and harden fully (chocolate: 30–60 minutes in a cool area; isomalt: until fully set at room temperature).
- Brush with edible gold luster dust diluted with a clear food-grade alcohol or use dry dust per product directions for a metallic sheen.
Safety note: Isomalt is very hot when melted—use gloves and heat-safe tools. If using wooden toothpicks or skewers as supports, ensure they are food-safe and remove any non-edible supports before serving.
Coloring and Shaping Techniques
For a twisted spiral, slightly rotate the cone while piping. For ombré or pearlescent effects, layer tinted chocolate or dry-brush petal dust. If using chocolate, tempering improves snap and sheen tempering times vary by chocolate type.
Crafting Fondant Unicorn Ears
Fondant ears are lightweight and easy to color. They complement the horn and finish the face.
Ear Templates and Shapes
Roll fondant to about 3–4 mm (1/8″) thickness. Use a printable ear template to cut matching shapes: a larger outer ear and a smaller inner ear piece in a contrasting color (paste the inner piece with a tiny dab of water or edible glue).
Attaching Ears Securely to the Cake
Support ears by inserting food-safe picks, short wooden skewers, or uncooked spaghetti into the ear base and positioning into the chilled buttercream so they stand upright. For extra security, add a small ball of fondant behind the ear inside the cake for a hidden anchor. Remove non-edible supports before slicing and serving.
| Material | Pros | Cons |
| Chocolate | Delicious flavor; easy to color and paint | Can soften or melt in warm conditions |
| Isomalt | Translucent, sturdy, glass-like finish | Requires careful handling and heat safety |
| Fondant | Flexible, easy to shape and color | Can crack if dried too thin; texture not for all tastes |
Materials & time quick list: chocolate horn (1–2 hours incl. setting), isomalt horn (1–2 hours incl. cooling), fondant ears (30–45 minutes including drying time). Pro tip: test-fit toppers on the chilled cake before bringing it to the party — you can make final adjustments quickly without disturbing the frosting.
5. Decorating Techniques for Stunning Unicorn Cakes
Great decoration turns a basic sponge into a show-stopping unicorn cake. Focus on smooth frosting, confident piping, and a few magical accents—and you’ll get a photogenic result that tastes as good as it looks.
Frosting and Piping Methods
Start with the fundamentals: a stable buttercream base and the right tips. A smooth, even finish makes all other decorations pop.
Achieving Smooth Buttercream Coverage
1. Apply a thin crumb coat to seal crumbs, then chill 20–30 minutes.
2. Use a turntable and bench scraper with long, steady strokes for a satin-smooth final coat.
3. If edges look uneven, chill again and use a warm offset spatula (wipe between passes) for a polished finish.
Creating Rosette and Swirl Patterns
Use a Wilton 1M star tip for classic rosettes and swirls. For a flowing mane, pipe rosettes and swirls in clusters down one side or across the back of the cake. Speed tip: load three piping bags with adjacent colors in a single larger bag (or use a multi-compartment coupler) to pipe a multicolor mane in one pass.
Adding Magical Details
Small accents elevate the look—think shimmer, texture, and tiny edible features.
Edible Glitter and Sparkles
Choose only food-grade edible glitter or luster dust (look for FDA/food-safety labeling). Apply dry dust with a small brush for a subtle sheen; use a tiny amount so the shimmer complements, not overwhelms, the buttercream.
Sprinkle Arrangements and Candy Toppings
Strategically place rainbow sprinkles, star confetti, and candy pearls along the mane or cake base. For tidy application, pipe a thin strip of buttercream where you want sprinkles to stick, then press them on gently.
Face and Facial Features
The unicorn’s face gives personality keep it simple and cute.
Creating Cute Unicorn Eyes and Mouth
Pipe closed, sleepy eyes using a small round tip or use melted dark chocolate (piped and chilled to set). Add long, curved eyelashes for a kawaii look. For a mouth, a small piped heart or a tiny fondant shape works well.
Adding Blush and Cheek Details
For rosy cheeks, lightly tap pink petal dust or diluted gel coloring with a clean sponge or brush. Place the eyes roughly one-third down from the top and cheeks a bit below and to the sides for balanced, adorable proportions.
Materials quick list: buttercream (stabilized for piping), Wilton 1M tip, small round tip, bench scraper, turntable, petal dust, food-grade glitter, piping bags, and a few small bowls for mixing colored buttercream. For more help, include a short video demo or printable piping guide alongside the recipe to practice mane and rosette techniques.
6. Unicorn Cake Design Ideas for Every Style
Unicorn cakes can be playful or refined—perfect for kids’ birthday parties, baby showers, or elegant adult gatherings. Below are three popular directions with a quick “best for,” difficulty, and time estimate plus specific color palettes to help you choose a look.
6.1 Classic Rainbow Unicorn Cake
Best for: kids’ birthdays and colorful celebrations. Difficulty: Moderate. Time: 3–4 hours (or longer for 5–7 layers).
6.1.1 Layered Rainbow Colors
Go big with a 3–5 layer pastel or 5–7 layer bright rainbow interior (ROYGBIV or a pastel variant). Practical choice: five 8″ layers give a dramatic reveal without being overwhelming.
6.1.2 White Frosting with Colorful Details
Use white vanilla buttercream as a clean exterior to showcase the colorful interior. Add a bold buttercream mane (pink, lavender, mint, sky blue), a gold-look horn, and rainbow sprinkles for a classic rainbow unicorn finish.
6.2 Modern Minimalist Unicorn Cake
Best for: adult gatherings and baby showers. Difficulty: Easy–Moderate. Time: 2–3 hours.
6.2.1 Subtle Color Palettes
Choose muted tones like dusty rose, sage green, and pale gold. Use a single thin colored layer inside or keep the cake plain inside and rely on subtle exterior accents.
6.2.2 Geometric and Abstract Designs
Try angular horns and triangular ears, minimal piped details, or abstract buttercream brush strokes. This style favors negative space—less is more.
6.3 Whimsical and Fantasy-Inspired Designs
Best for: themed parties and creative shoots. Difficulty: Moderate–Advanced. Time: 3–5+ hours depending on decorations.
6.3.1 Cloud and Star Decorations
Add fondant clouds, edible star toppers, and isomalt gems for a dreamy, fantastical cake. Place stars and clouds around the horn and mane for a sky-inspired composition.
6.3.2 Floral and Nature Themes
Use cascading buttercream florals or carefully arranged fresh flowers (ensure stems don’t touch the cake use flower picks). Consider painted vines or buttercream succulents for an earthy, enchanted look.
Color palette suggestions (gel food-color guidance):
- Classic Rainbow: Pastel pink, pale yellow, mint, sky blue, lavender (use gel coloring, start with a pea-sized amount and build).
- Minimalist: Dusty rose, sage green, pale gold (use muted gels or dilute with a tiny bit of buttercream to soften).
- Whimsical: Pearl white base with accents of blush, periwinkle, and metallic gold (use petal dusts and edible luster for shimmer).
Quick tip: pick a design matching your time and skill classic rainbow for maximum impact, minimalist for speed and elegance, whimsical for arty displays. Each design translates well to cupcakes or sheet cakes if you need to scale up for a large birthday party.
7. Unicorn Cake Toppers and Accessories
Adding delightful toppers to your unicorn rainbow cake elevates the look and ties the whole theme together. Below are safe, photogenic options both edible and non-edible plus quick pros/cons and storage tips for planning ahead.
Edible Toppers
Edible toppers look great and can be eaten safely when you use food-grade materials. Favorites include:
- Wafer paper & isomalt decorations: Wafer paper can be cut or printed with edible ink for butterflies, clouds, or name tags. Isomalt can be molded into translucent gems or a glass-like horn for a professional finish (follow safety guidance when working with hot sugar).
- Chocolate figures & sculptures: Tempered white chocolate can be shaped into unicorns, rainbow arches, or letters. Use oil-based or cocoa-butter-compatible colorings to keep colors vibrant on chocolate.
Pros: edible, no removal required before serving; Cons: may be delicate (isomalt) or sensitive to heat (chocolate).
Non-Edible Cake Toppers
Non-edible toppers are durable keepsakes and often faster to install. Options include:
- Unicorn figurines & acrylic toppers: Small resin or acrylic unicorns, custom name/age toppers, or glittered keepsakes make attractive display pieces.
- Banners & balloon attachments: Mini banners on skewers or small balloon clusters add height and a festive look—great for photos.
Pros: reusable, sturdier for travel; Cons: not edible—must be wrapped or held off the cake surface.
Food-safety tip: Always use food-safe holders or wrap non-edible items in plastic wrap so nothing directly contacts the frosting. Insert non-edible skewers into a small food-safe sleeve or place a thin sheet of parchment under the topper base.
Make-ahead & storage: Store edible toppers (fondant ears, chocolate figures, isomalt gems) in airtight containers at room temperature or in the fridge depending on the material. Keep non-edible keepsakes separate in a labeled box so you don’t accidentally put them on the cake without wrapping.
Quick cost/time guide: DIY edible toppers take more time (30–90 minutes) but are budget-friendly; store-bought non-edible toppers cost more but save prep time and provide a lasting memento.
8. Planning a Unicorn-Themed Birthday Party
Planning a unicorn-themed birthday party should be as fun as the cake itself. Coordinate decorations, menu, and activities around your unicorn cake so the celebration feels cohesive and magical for guests of all ages.
Coordinating Decorations and Theme
Keep a consistent palette and a few repeating motifs (horn, mane, stars) to tie the room together.
Table Settings and Centerpieces
- Pastel tablecloths: Lavender, blush pink, and mint set a soft, whimsical base.
- Iridescent charger plates: Add subtle shimmer that complements the unicorn cake’s gold accents.
- Gold flatware: A small touch of gold elevates the table styling without overpowering the theme.
- Floral arrangements: Small bouquets in lavender and blush work well as centerpieces—use spoke picks or a barrier if using fresh stems to avoid contact with cake surfaces.
Balloons and Banners
- Balloon garlands: Create a rainbow gradient or pastel blend as a backdrop behind the cake table.
- Oversized unicorn face foil balloons: Great visual focal point for photos.
- Personalized banners: Glittery name or age banners in gold finish pair beautifully with a golden-look horn on the cake.
Complementary Food and Desserts
Round out the dessert table with themed treats that are easy to eat and kid-friendly.
Unicorn Cupcakes and Cookies
- Unicorn cupcakes: Top mini horns and ears on cupcakes for guests to grab-and-go.
- Unicorn cookies: Royal-iced cookies in unicorn shapes are great party favors package individually.
Rainbow Drinks and Snacks
- Layered rainbow lemonade: Non-alcoholic, colorful, and refreshing—serve in clear dispensers.
- Unicorn hot chocolate: Offer with pastel whipped cream and sprinkles for a cozy option.
- Colored white chocolate popcorn: Easy to prep and kid-approved.
Party Activities and Entertainment
Plan a mix of craft, active, and photo-friendly activities to keep energy balanced.
Unicorn Craft Ideas
- Unicorn horn craft station: Provide paper cones, glitter, stickers, and elastic bands so kids create wearable horns (supervise small parts).
- Pin-the-horn-on-the-unicorn: A unicorn twist on a classic game—use soft stickers for safety.
Games and Interactive Activities
- Photo booth: Set up a backdrop with props like rainbow wigs, glittery sunglasses, and plush unicorn headbands for memorable photos.
- Simple relay or treasure hunt: Tailor activities to the age group so everyone can participate.
Planning Practicalities
Party timeline: Set up 2 hours before guests arrive; plan cake cutting about 60–90 minutes into the party. Food safety: Keep temperature-sensitive items chilled and label for common allergens. Budget tip: DIY decor (balloon garlands, printable banners) lowers costs—store-bought toppers or a local bakery-made unicorn cake save time if budget allows.
With thoughtful coordination matching colors, complementary food, and a few interactive activities your unicorn birthday cake will be the delicious, Instagram-friendly centerpiece that ties the whole party together.
9. Storing and Preserving Your Unicorn Cake
Proper storage keeps your unicorn cake tasting fresh and looking vibrant. The right method depends on the type of frosting, ambient temperature, and whether you’re storing whole cakes, cut slices, or pre-baked layers.
9.1 Proper Storage Methods
Choose storage based on frosting and climate—see the quick decision guidance below.
9.1.1 Room Temperature Storage
Buttercream-frosted cakes can be stored at room temperature for up to 48 hours in cool conditions (ideally under 75°F / 24°C). Cover the cake with a cake dome or invert a large bowl to protect it from dust and drafts.
9.1.2 Refrigeration Guidelines
Cakes with cream cheese frosting, fresh fruit, or perishable fillings should be refrigerated. Wrap the cake or cut slices tightly in plastic wrap to prevent odor absorption and drying. Before serving, allow refrigerated buttercream cakes to sit at room temperature for 1–2 hours so the buttercream softens and flavors return.
9.2 Freezing and Make-Ahead Tips
Making components ahead saves time on party day. Follow these tips for best results.
9.2.1 Freezing Baked Layers
Fully cool cake layers, then wrap each layer tightly in plastic wrap and a layer of foil. Freeze flat for up to 1 month. When ready to use, thaw in the fridge overnight, then bring to room temperature for about 1 hour before leveling and assembling.
9.2.2 Preparing Decorations in Advance
Many decorations can be made ahead: fondant ears, chocolate horns, and isomalt gems store well in airtight containers at room temperature (except chocolate, which is best refrigerated in hot climates). Save edible glitter and delicate petal dust for final touches just before decorating to preserve shine.
9.3 Maintaining Freshness and Quality
Small steps help retain moisture, texture, and color.
9.3.1 Preventing Drying and Staleness
For cut cake, press plastic wrap gently against exposed crumbs to prevent drying. Store slices in airtight containers or wrap tightly. If a cake edge starts to harden, a thin spread of fresh buttercream can revive it.
9.3.2 Preserving Color Vibrancy
Keep your cake out of direct sunlight and away from heat sources—UV and heat can fade and dull gel-colored buttercream. For display outdoors or in bright rooms, place the cake in a shaded or covered area and avoid prolonged exposure.
| Storage Method | Duration | Best Practices |
| Room Temperature | Up to 2 days (cool conditions) | Cover with a dome or bowl; avoid heat & sunlight |
| Refrigeration | Up to 1 week | Wrap tightly in plastic wrap; allow to soften before serving |
| Freezing Layers | Up to 1 month | Wrap in plastic and foil; thaw in fridge overnight, then rest at room temp 1 hour |
10. Creative Unicorn Cake Variations to Explore
If you love unicorn cakes, you’ll enjoy experimenting with formats beyond the classic tiered cake. These variations fit different crowd sizes, skill levels, and events—from classroom parties to elegant showers.
Unicorn Cupcake Toppers
Best for: grab-and-go treats, kids’ parties, bake sales. Time/Difficulty: Easy–Moderate.
Unicorn cupcake toppers turn simple cupcakes into tiny unicorn cakes—perfect when you need individual servings or a pull-apart display.
Mini Unicorn Cakes for Individual Servings
Make horn and ear toppers smaller to fit on cupcakes or mini cakes. For horns, pipe chocolate or shape fondant into 1–1.5″ cones; for ears, cut fondant to 3–4 mm (1/8″) thickness and trim to a small ear template.
Cupcake Decorating Ideas
Tint buttercream in small bowls and pipe a mini mane using a Wilton 1M tip. Add tiny piped eyes or use edible ink on wafer paper for consistent faces. Sprinkle a few tiny rainbow sprinkles or star confetti for extra charm.
Gender Reveal Unicorn Cakes
Best for: gender-reveal events and baby showers. Time/Difficulty: Moderate.
Hidden Color Reveals
Use a neutral cake batter and hide a colored filling or center (pink or blue buttercream or colored cake crumbs). When cut, the inside reveals the color. Note food-safety/allergy considerations label ingredients and avoid surprising guests with allergens.
Pink and Blue Theme Variations
Complement the reveal with soft lavenders, mint accents, and gold touches so the cake feels cohesive before and after the cut.
Unicorn Sheet Cakes and Pull-Apart Designs
Best for: large groups, school events, office parties. Time/Difficulty: Easy–Moderate.
Large Format Cake Options
Decorate a sheet cake with a piped unicorn face—simple and efficient. For pull-apart designs, arrange 24–36 cupcakes in a rectangle or circle to form the unicorn image; frost cupcakes so they touch and appear as one large cake.
Easy Decoration Methods for Beginners
Use pre-made toppers (mini horns/ears) and apply a uniform buttercream base on each cupcake. For a cohesive look, pipe the mane in sections so adjacent cupcakes create continuous swirls.
Don’t forget unicorn cookies—decorate with royal icing and package as favors. Cookies are vegetarian-friendly when using vegetarian icing and make great takeaways for guests.
11. Common Mistakes to Avoid When Making a Unicorn Cake
Making a unicorn cake is rewarding, but a few common pitfalls can turn the process sour. Use these practical do/don’ts and troubleshooting tips to keep your cake looking magical and tasting great.
Baking and Texture Issues
Getting the bake and crumb right is the first step to a beautiful finished cake.
Preventing Dense or Dry Cake
- Do: Measure flour by weight or use the spoon-and-level method; mix just until ingredients are combined.
- Don’t: Overmix after adding flour — that develops gluten and makes the cake tough.
- Tip: Use an oven thermometer to ensure accurate oven temperature; bake times vary by pan and rack position.
Even Baking and Level Layers
- Do: Use cake strips and place pans on the center rack for even heat distribution.
- Don’t: Stack pans too close together in the oven — bake in batches if needed.
- Tools: Use a serrated knife or cake leveler to trim domes for a flat, professional stack.
Decoration Challenges
Decorating mistakes are often fixable if you know the common causes.
Color Bleeding and Mixing
- Do: Apply a thin crumb coat and chill before the final frosting to lock crumbs and colors.
- Don’t: Stack warm layers or pipe wet colors next to each other without chilling — they may run together.
- Pro tip: Use separate piping bags for each color and clean tips between colors to keep edges crisp.
Structural Instability with Toppers
- Do: Support heavy toppers (isomalt horns, dense chocolate pieces) with food-safe dowels or support rods inserted into the cake.
- Don’t: Rely on unreinforced frosting to hold weight — it can slide, especially on warm days.
- Example: An isomalt horn is heavier and more rigid than a hollow chocolate horn — use at least two support dowels for isomalt and remove any non-edible supports before serving.
Timing and Planning Errors
Timing mistakes often lead to rushed decorating or structural problems. Plan ahead.
Not Allowing Adequate Cooling Time
- Do: Cool layers completely before frosting — ideally chill layers for 30–60 minutes to firm them up for leveling and stacking.
- Don’t: Attempt to frost warm layers; trapped steam causes sliding and melting of buttercream.
- Note: If you chill layers overnight, wrap them well to prevent condensation when bringing them to room temperature.
Rushing the Decoration Process
- Do: Break decorating into stages (crumb coat → chill → final coat → decorations) and give yourself short breaks.
- Don’t: Try complex piping or delicate toppers at the last minute — this increases error risk.
Quick Trouble shooting Table
| Issue | Likely Cause | Quick Fix |
| Dense cake | Overmixing / too much flour | Mix gently; measure by weight next time |
| Domed/browned top | Oven hot spot / too hot | Use oven thermometer; lower temp 10–25°F and use strips |
| Colors bleeding | Warm layers / wet frosting | Chill layers; use crumb coat and chill before final frosting |
| Toppers sliding | Lack of support / soft frosting | Insert dowels; chill cake; reduce topper weight |
By following these do/don’ts and quick fixes, you’ll avoid the most common mistakes and feel confident to make a show-stopping unicorn cake. Patience, small tests (like a practice rosette), and sensible supports are the simplest ways to ensure success when you make unicorn cake at home.
12. Conclusion
Making a unicorn cake is more than a baking task—it’s a creative celebration. With basic tools, a reliable recipe, and a few decorating tips (smooth buttercream, a secure horn, and a colorful mane), you can make a cake that delights guests and looks great in photos.
Next steps: gather your pans and piping tips, choose a 3‑ or 5‑layer plan, and set aside time this weekend to try the beginner 3‑layer recipe. Small practice runs (a test rosette or a mini horn) are quick ways to build confidence.
Ready to make unicorn magic? Download or print the recipe card and checklist, or watch a short decorating demo to follow along step-by-step. Happy baking and enjoy the smiles your unicorn cake will bring.
You may also enjoy these recipes:
FAQ
What are the key elements of a unicorn cake?
A classic unicorn cake combines a clean exterior (often white or pastel buttercream) with a colorful interior—rainbow layers or a pastel variant—plus a sculpted horn (painted with food‑grade gold luster) and ears made from fondant or piped buttercream. Small details like sprinkles, edible glitter, and a piped mane complete the look.
How do I make a unicorn cake from scratch?
Make the cake batter, divide and tint portions with gel food coloring, and bake your layers. Cool and (optionally) chill layers, level and stack with vanilla buttercream, apply a crumb coat and final coat, then add the horn, ears, mane, and edible details. See the Recipe and Decorating sections for step-by-step instructions and timing tips.
What tools do I need to bake a unicorn cake?
Essential tools include 6″ or 8″ round cake pans, multiple mixing bowls, an electric mixer, piping bags, and tips (Wilton 1M for rosettes; small round tip for eyes). Helpful extras: turntable, bench scraper, serrated knife or cake leveler, and an oven thermometer.
Can I make a unicorn cake dairy-free or egg-free?
Yes. Substitute plant-based butter and use oat or almond milk. For egg-free cakes, flax eggs (1 tbsp ground flaxseed + 3 tbsp water = 1 egg) work in many recipes, though texture may differ slightly. Always label allergen substitutions when serving guests.
What are some popular unicorn cake design ideas?
Popular styles include the Classic Rainbow (multi-layered colorful interior with white buttercream), Modern Minimalist (muted palettes, clean lines), and Whimsical Fantasy (clouds, stars, cascading buttercream florals). Choose a style based on the event and your comfort level.
How can I personalize my unicorn cake?
Personalize with edible toppers, custom acrylic or resin keepsake figurines (wrapped for food safety), themed colors, or a name/age banner. Consider the birthday person’s favorite colors or a coordinating party theme when selecting accents.
What are some complementary desserts for a unicorn-themed party?
Serve unicorn cupcakes topped with mini horns and ears, royal‑iced unicorn cookies as favors, and a rainbow fruit platter or colored white chocolate popcorn for lighter options that fit the theme.
How should I store my unicorn cake after baking?
Buttercream cakes can be stored at room temperature up to 48 hours in cool conditions (under ~75°F / 24°C). Cakes with cream cheese or fresh fruit must be refrigerated. For longer keep, freeze baked layers wrapped in plastic and foil for up to 1 month—thaw in the fridge overnight, then bring to room temperature before assembling.
What common mistakes should I avoid when making a unicorn cake?
Avoid overmixing batter, stacking warm layers, and skipping supports for heavy toppers. Cool layers fully before frosting, apply a crumb coat and chill, and use dowels for structural stability to prevent sliding or sagging.
Can I use unicorn cake techniques for other occasions?
Absolutely techniques like rainbow layers, buttercream mane piping, and topper construction work well for custom graduation cakes, gender-reveal cakes, and themed desserts. See the Variations section for scalable ideas.
Where can I find the printable recipe or follow a decorating demo?
Download the printable recipe card and checklist from the Recipe section or watch a short step-by-step decorating demo linked in the Decorating Techniques section to practice mane piping and rosettes. Subscribe for updates or printable downloads if available.